This post may contain affiliate links. Please read our policy page.
Transform your garden effortlessly with these 22 quick and easy decor hacks! Use pallet wood to create charming planters or repurpose old tires into quirky garden beds. Consider hanging mismatched tea cups as charming bird feeders to attract wildlife. For functional beauty, craft a stone pathway with pebbles or turn mason jars into enchanting lanterns. These are just a few ideas—stick around to discover even more innovative ways to elevate your garden’s charm!
Use Pallet Wood for Planters
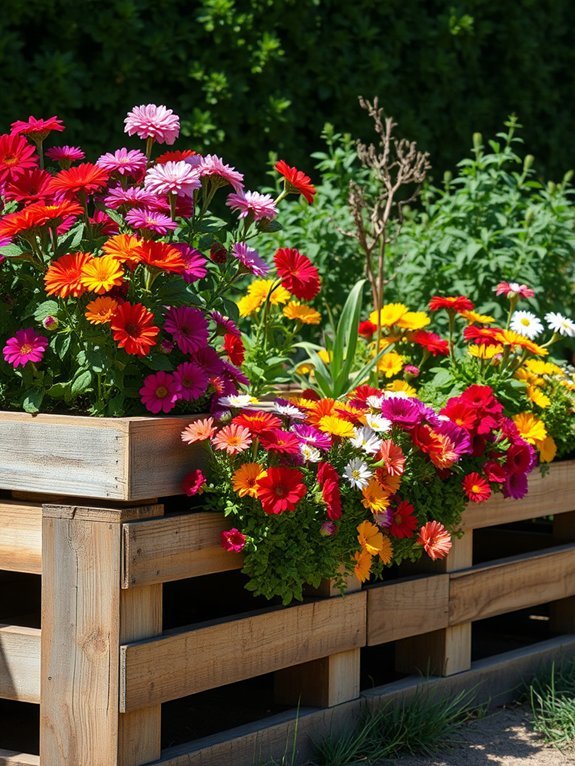
If you’re looking for an eco-friendly and cost-effective way to enhance your garden, using pallet wood for planters might just be the perfect solution. Pallets are often discarded after use, making them an excellent resource for sustainable gardening. You can easily transform them into unique planters with minimal effort. Simply disassemble the pallets, sand the wood to prevent splinters, and reassemble them into a planter shape that fits your style. Don’t forget to line the planter with landscape fabric to protect against soil erosion. You can paint or stain the wood for a more personalized touch. By using pallet wood, you’ll create charming and functional planters while reducing waste and saving money. Your garden will flourish with personality!
Repurpose Old Tires Into Garden Beds

While traditional garden beds have their charm, repurposing old tires can add a creative twist to your outdoor space. Start by gathering a few old tires—check local junkyards or your own garage. Clean them thoroughly, removing any residue. Stack them for height or leave them flat for a more spread out look. Fill them with quality soil, making sure they drain well. Now, plant your favorite flowers, herbs, or vegetables in these quirky beds. Not only are they eco-friendly, but tires also retain heat, helping your plants thrive. To elevate the design, you can paint the tires in bright colors or patterns that match your style. Enjoy your unique garden beds as they become a focal point in your yard!
Hang Tea Cups as Bird Feeders

When you’re looking to add charm to your garden, hanging tea cups as bird feeders can create a whimsical yet functional decoration. Start by selecting mismatched tea cups that reflect your style. You’ll want to drill a small hole in the base of each cup for drainage. Then, attach the cups to hooks or sturdy branches using twine or wire. Fill them with birdseed or fresh fruits to attract feathered friends. This method not only provides food for birds but also adds delightful color and personality to your outdoor space. Remember to replace the food regularly and clean the cups to keep your little visitors happy and healthy. Your garden will flourish with newfound life and charm!
Create a Stone Pathway With Pebbles

After adding whimsical tea cup bird feeders to your garden, consider enhancing the outdoor aesthetic with a charming stone pathway using pebbles. This project not only beautifies your space but also provides a functional walkway. Here’s how to create your own:
- Select Your Pebbles: Choose a variety of shapes and colors to create visual interest.
- Plan Your Pathway: Lay out the design before you start. You can opt for a straight line or a gentle curve, depending on your garden’s layout.
- Prepare the Ground: Clear the area, ensuring it’s level. Add a layer of landscaping fabric to prevent weeds, then pour and spread the pebbles evenly.
Now, step back and appreciate your stunning new path!
Turn Mason Jars Into Lanterns

Transforming ordinary mason jars into enchanting lanterns can add a magical glow to your garden during evening gatherings. Start by cleaning your jars and removing any labels. Fill each jar with fairy lights or tea lights for a lovely ambiance. If using tea lights, consider placing a thin layer of sand or gravel at the bottom to stabilize them. For a rustic touch, wrap twine or burlap around the neck of the jar and secure it with a bow. You can hang your lanterns from tree branches or line them along pathways to guide guests. Customize your jars by painting or adding decorative embellishments to match your garden’s theme. This simple hack quickly elevates any outdoor space!
Use Wine Bottles as Edging

Wine bottles can serve as a unique and stylish edging solution for your garden beds. Not only do they add character, but they also create a clear boundary that enhances your garden’s aesthetics. Here’s how to make the most of this creative idea:
- Choose a Color Palette: Select bottles in shades that complement your plants, like green, brown, or blue, to create a cohesive look.
- Bury the Bottoms: To stabilize the bottles, dig a shallow trench and place them upside down, leaving the tops exposed. This helps prevent tipping.
- Mix Heights: For visual interest, use bottles of varying heights. This creates a dynamic effect that draws the eye.
You’re all set to transform your garden with this eco-friendly edging!
Craft a Vintage Ladder Plant Stand

If you’re looking to elevate your garden décor with a touch of rustic charm, crafting a vintage ladder plant stand is a fantastic way to do it. You can easily achieve this with an old wooden ladder, bringing both style and function to your outdoor space. Here’s a simple guide to help you get started:
| Step | Description |
|---|---|
| Choose Ladder | Find a ladder in good condition. |
| Clean It Up | Sand down any rough spots and clean it. |
| Paint/Finish | Optionally, apply a weatherproof finish. |
| Arrange Plants | Position pots on each rung for a tiered effect. |
This stand not only showcases your plants beautifully but also adds a whimsical touch to your garden. Give it a try!
Make a Garden Art Feature With Old Tools

Old tools can add a unique flair to your garden, turning forgotten relics into stunning art features. Instead of tossing out those rusty spades or old rakes, think creatively! Here are three fun ideas to inspire you:
- Garden Sculpture: Arrange old tools in creative patterns or shapes, like a sunburst or tree. Secure them with brackets for stability.
- Planters: Transform shovels or wheelbarrows into quirky planters. Fill them with colorful flowers or succulents for a vibrant touch.
- Wind Chimes: Use old wrenches or saw blades to create rustic wind chimes. Hang them from a tree or porch to add music to your garden.
Use Tin Cans for Herb Gardens

While you sip your favorite beverage in the garden, consider using tin cans to create a charming herb garden. This eco-friendly project not only recycles materials but also adds a rustic touch to your outdoor space. Simply clean the cans, removing labels, and punch a few drainage holes in the bottom. Fill each can with potting soil and plant your favorite herbs—basil, mint, or rosemary work beautifully!
You can personalize the cans by painting them or wrapping them with twine for extra flair. Arrange your herb garden on a sunny windowsill or patio where you can easily access them while cooking. This simple decor hack brings life to your garden and guarantees fresh herbs are just steps away!
Decorate Fences With Colorful String Lights

After setting up your charming herb garden in tin cans, take your outdoor decor to the next level by adorning your fences with colorful string lights. These lights instantly transform your garden into a vibrant evening retreat. Plus, they’re super easy to install! Here’s how to make the most of them:
- Choose the Right Lights: Look for weather-resistant options that suit your style—twinkling, globe, or lantern designs.
- Plan Your Layout: Map out where you want to hang the lights for an even spread, ensuring they’ll highlight your garden features.
- Add a Timer: Set your string lights on a timer so they illuminate your space effortlessly at dusk.
With just a few simple steps, you’ll create an inviting atmosphere for you and your guests.
Create a Fairy Garden in a Pot

If you want to add a touch of magic to your outdoor space, creating a fairy garden in a pot is a delightful option. Start with a large planter filled with potting soil. Choose small plants like succulents or moss to serve as a gentle, enchanting landscape. Next, add miniature decorations—think tiny fairy houses, whimsical stones, or even miniature furniture—to spark your imagination. You can also include charming accessories like pebbles and miniature fences to enhance the scene. Don’t forget to incorporate elements like small LED lights for a twinkling effect at night. Once you’ve set it up, find a cozy spot where the fairy magic can thrive. Enjoy watching your tiny world transform with each passing day!
Use Plastic Bottles for Self-Watering Planters

When you’re looking for an eco-friendly and efficient way to keep your plants hydrated, using plastic bottles for self-watering planters is an excellent choice. It’s easy, sustainable, and helps guarantee your plants get just the right amount of water. Here’s how to get started:
- Gather materials: Collect empty plastic bottles, scissors, and potting soil.
- Prepare the bottles: Cut the bottle in half, keeping the top portion with the cap. Poke holes in the cap for drainage.
- Assemble the planter: Invert the top half into the bottom half, fill it with soil, and plant your seeds or seedlings.
Now, you’ll have a simple self-watering system that minimizes water waste and keeps your plants thriving!
Hang Old Bottles From Trees

Transforming old bottles into unique hanging decor can add a whimsical touch to your garden. Start by collecting various glass or plastic bottles. You can paint them in vibrant colors or leave them clear for a more natural look. Next, use sturdy twine or fishing line to suspend the bottles from tree branches or hooks. Fill the bottles with flowers, fairy lights, or colorful stones to enhance their visual appeal. Additionally, etching designs on the bottles can create interesting shadows in your garden. Make sure they’re hung securely to withstand wind and rain. This simple project not only beautifies your outdoor space but also repurposes items that might otherwise go to waste, making your garden both eco-friendly and unique.
Create a Mosaic Table Top With Broken Tiles
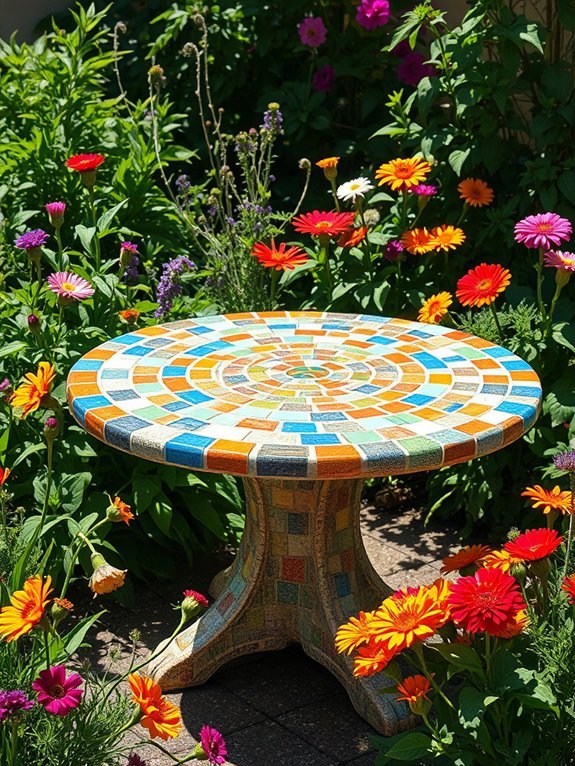
Adding a whimsical touch to your garden doesn’t stop with hanging bottles; you can elevate your outdoor space even further by creating a stunning mosaic table top with broken tiles. This DIY project is not only beautiful but also a fantastic way to recycle old materials.
Here’s what you’ll need:
- Broken Tiles: Gather colorful ceramic or glass pieces from old dishes or tiles.
- Table Surface: Use a sturdy base, like a wooden or metal table that can withstand outdoor elements.
- Adhesive & Grout: Get a strong outdoor adhesive and grout for sealing everything together.
Simply arrange the tiles in a design you love, glue them down, and fill in the gaps with grout. Your garden will shine with personality!
Recommended Items
Spruce up your garden with these delightful finds and handy tools!
Make a Vertical Garden With Pallets

A vertical garden made with pallets can turn even the tiniest outdoor spaces into a lush oasis. To create your own, start by finding a sturdy pallet; make sure it’s clean and free of chemicals. Lay it flat and line the back with landscape fabric to hold soil in place. Next, fill the spaces between the wood slats with potting mix. Choose a mix of herbs, flowers, and trailing plants for variety. Once planted, lean the pallet against a wall or fence, securing it for stability. Water regularly and enjoy watching your garden flourish. This DIY project not only enhances your space, but it’s also a great way to grow your own herbs and flowers in a compact design!
Use an Old Window Frame for a Photo Display

Repurposing materials can bring unique charm to your garden decor, and an old window frame is a fantastic way to showcase your favorite memories. With a little creativity, you can transform that forgotten frame into a charming photo display. Here’s how to get started:
- Select Your Photos: Choose a mix of your favorite images, perhaps family portraits or landscapes that inspire you.
- Arrange the Photos: Use wire or twine to hang your photos securely within the frame, allowing for easy swaps and updates.
- Decorate: Add some garden-themed embellishments, like dried flowers or fairy lights, to enhance the frame’s appeal.
Repurpose Wooden Crates for Storage

If you’ve got some wooden crates lying around, turning them into storage solutions can enhance both your garden’s organization and its aesthetic. Start by deciding where you want to place the crates—whether they’re going to be stacked, arranged on shelves, or positioned under a potting bench. Sand down any rough edges to prevent splinters, then paint or stain them to match your garden decor. You can use crates to store gardening tools, packages of seeds, or even outdoor cushions. If you prefer a more decorative approach, fill them with potted plants for a unique visual display. With just a little creativity, your wooden crates can become functional and stylish additions to your garden space!
Action Steps for Garden Decor Hacks
Transform Broken Pots Into Succulent Gardens

Broken pots don’t have to end up in the trash—instead, they can be transformed into charming succulent gardens. Repurposing those broken pieces not only adds character to your garden but also uses materials that would otherwise be wasted. Here’s how to create your own succulent garden from broken pots:
- Choose Your Shards: Select interesting pieces or broken sections that can serve as planters.
- Prepare the Base: Place some rocks or gravel at the bottom for drainage, then fill with soil designed for succulents.
- Plant the Succulents: Arrange your succulents creatively, ensuring they have enough space to grow.
With just a bit of effort, you’ll create a delightful focal point in your garden that’s both eco-friendly and beautiful!
Use Clothespins for Photo Displays

While garden decor often focuses on plants, you can easily add a personal touch by showcasing your favorite memories using clothespins. Start by selecting a string or wire to create a line across a fence, trellis, or even between two trees. Use vibrant clothespins to attach photos that highlight special moments, family gatherings, or beautiful views from your garden. This simple project not only adds color and charm to your space but also invites friends and family to share in your cherished memories. You can even customize clothespins with paint or decorative tape for an extra personal flair. With just a few minutes of effort, you’ve transformed your garden into a delightful display of creativity and nostalgia.
Make Garden Markers From Rocks

Transform ordinary rocks into charming garden markers that enhance your outdoor space and keep things organized. This simple DIY project adds a personal touch while helping you identify your plants easily. Here’s how to get started:
- Select Your Rocks: Choose smooth, flat stones that provide a good surface for writing.
- Paint and Label: Use outdoor paint or permanent markers to write the names of your plants. Add fun designs for extra flair!
- Seal for Longevity: Once dry, apply a clear sealant to protect your markers from the elements.
These rock markers not only serve a functional purpose but also allow you to showcase your creativity while sprucing up your garden. Have fun with this easy, eco-friendly project!
Create a Hanging Garden With Macramé

Creating a hanging garden with macramé is an exciting way to elevate your plant display and make a unique statement in your home or garden. With just a few supplies, like macramé cord and your favorite pots, you can craft beautiful plant hangers. Start by cutting the cord into equal lengths, then tie them together using simple knots to create a secure basket for your plants. Make sure to choose lightweight pots for easy hanging. You can hang these planters indoors near windows or in protected outdoor spaces. Mixing different plant types adds visual interest. Experiment with various knotting techniques to personalize your design, and watch your greenery transform the space into a lush retreat!
Use Old Shovels as Unique Wall Art

Old shovels can be an eye-catching addition to your garden decor, adding a touch of rustic charm to your walls. Transforming them into unique wall art is easy and fun! Here’s how you can do it:
- Choose Your Shovels: Look for shovels with interesting shapes or colors. Don’t worry if they’re rusty; that adds character!
- Prepare the Surface: Clean them up and consider optional painting. A bright hue can make them pop against your wall.
- Hang Them: Arrange the shovels in a creative pattern. You can use nails or hooks, depending on the weight.
This simple hack not only recycles old tools but also creates a striking focal point in your garden. Enjoy your new decor!
